Batch picking
Scanpacker’s batch picking feature allows you to pick items for multiple orders simultaneously, dramatically speeding up your fulfillment process. Instead of walking through your warehouse multiple times for each individual order, batch picking lets you collect items for several orders in a single pass.
How batch picking works
Batch picking combines multiple orders (a batch of orders) into a single picking session but with dedicated “slots” for each order. “Slots” are physical locations on your picking cart (like bins or totes) where items for each order are deposited.
Here’s the basic workflow:
- Create a batch - Select multiple orders to pick together, or let Scanpacker auto-select the next batch of pending orders.
- Pick items - Walk through your warehouse once, scanning items and depositing them into order-specific slots.
- Ship orders - After returning from picking, scan each slot to ship the corresponding order.
Preparing for batch picking
Before using batch picking, you need to configure your settings one time:
Physical setup
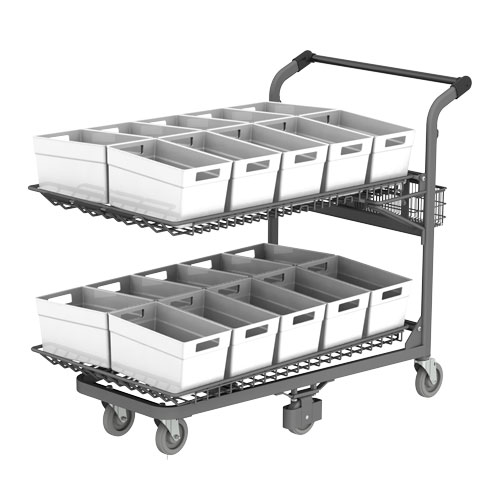
You’ll need a picking cart with multiple bins or slots—one for each order in your batch. See Picking cart setup for cart recommendations and setup instructions.
Configure batch size and slots
- Go to Settings → Batch Picking.
- Set your Batch Size (how many orders per batch, e.g., 8).
- Define Slot Names (e.g.,
A1, A2, A3, B1, B2, B3).- Slot names should be easy to read and locate on your cart.
- You must define at least as many slots as your batch size.
- Each slot name must be unique.
- Click “Print Batch Slot Labels” to print barcode labels for your slots.
- Attach the printed barcode labels to bins or totes on your picking cart.
- Each label contains a scannable barcode representing that slot (e.g., “A1”, “A2”).
Optional settings
- Batch pick part fulfillable orders - Allow orders that can only be partially fulfilled into batches.
- Batch pick require location scan - Force scanning of storage locations during picking for additional verification.
Creating a batch
There are three ways to start batch picking from the Orders page:
Batch pick next N orders
Click the “Start” dropdown and select “Batch pick next N…“ to automatically create a batch with the next pending orders (where N is your configured batch size). This is the fastest way to start batch picking.
Batch pick specific orders
- Use checkboxes to select specific orders you want to pick together.
- Click the “Start” dropdown.
- Select “Batch pick (N)” where N shows how many orders you’ve selected.
Auto-batch by tags
If you use order tags to organize your workflow, you can filter orders by tag and then batch pick all tagged orders together.
The picking process
Overview screen
When you open a batch, you’ll see a table showing all items that need to be picked:
- Product - The item name and variant.
- Location - The warehouse location where the item is stored (if configured).
- Qty - How many units to pick total across all orders.
- Slot - Which order slot(s) need this item.
Items are ordered by storage location to optimize your picking route through the warehouse.
Guided picking mode
Click “Start Guided Picking” to begin the step-by-step picking process:
- Scan the storage location (if required) - Scan the barcode of where the item is stored.
- Scan the product - Scan the product barcode to verify you have the correct item.
- The quantity counter increases with each scan.
- Scan multiple times for quantities greater than 1.
- Scan the destination slot - Scan the slot barcode where this item should be deposited.
- Repeat - The app automatically advances to the next item.
The interface uses color-coded borders to guide you through each step:
- Dark border indicates the current required scan.
- Grayed out sections indicate completed or future steps.
- Green checkmark appears when scanning is complete.
Partial picking
If you find insufficient stock for an item:
- Scan the quantity you have available.
- Use the menu (☰) to select “Part-pick this item”.
- The item will be marked as partially picked.
- You can complete it later or ship partial fulfillments.
Skipping items
If an item is out of stock or unavailable:
- Open the menu (☰) during that item’s picking.
- Select “Skip this item”.
- The app advances to the next item.
- The skipped item remains unpicked (quantity = 0).
Completing the batch
Finishing picking
When you’ve visited all items in the batch:
- If everything is fully picked, the batch automatically completes and shows the finished screen.
- If some items were skipped or partially picked, you’ll return to the overview screen.
- You can manually complete picking by selecting “Complete Picking” from the batch menu.
Shipping batch orders
After picking is complete:
- The Finished Batch screen shows all order slots and their quantities.
- Click “Ship Something” to begin shipping.
- Scan a slot barcode to load that order’s fulfillment screen.
- Complete the shipping process for that order.
- Repeat for each slot until all orders are shipped.
Part-picked orders
Orders with part-picked items will be marked with a (part-picked) indicator. You can:
- Ship partial fulfillments if your workflow allows.
- Skip them and come back later.
- Go back and complete the picking.
Managing batches
Viewing batches
Navigate to the Batches tab to see all batches:
- Open batches - Currently being picked.
- Picked batches - Picking complete, ready to ship.
- Closed batches - Fully completed.
Batch details
Each batch shows:
- Batch number - Unique identifier (starts at 500).
- Created by - Which user created the batch.
- Orders count - How many orders in the batch.
- Status - Open, Picked, or Closed.
- Progress - Percentage of items picked.
Reopening a batch
If you need to modify a completed batch:
- Open the finished batch.
- Select “Reopen Batch” from the menu.
- The batch returns to “open” status.
- You can resume picking or make changes.
Unpicking a batch
To reset all picking progress:
- Open the batch.
- Select “Unpick Batch” from the menu.
- All item quantities reset to zero.
- You can start picking from the beginning.
Deleting a batch
To cancel a batch:
- Open the batch.
- Select “Delete Batch” from the menu.
- All orders are unstarted and return to the pending orders list.
- The batch is permanently removed.
Orders with multiple fulfillment groups
If an order has multiple fulfillment groups, batch picking adds one fulfillment group per order to the batch. The remaining fulfillment groups for that order can be picked separately — either in a later batch or through sequential fulfillment.
Best practices
Optimize your picking route
- Configure storage locations for your products.
- Scanpacker automatically sorts items by location.
- Walk through your warehouse in location order.
Use appropriate batch sizes
- Larger batches = more efficiency but require more slots.
- Consider your physical space and product mix.
- Common batch sizes: 6-12 orders.
Label slots clearly
- Use durable barcode labels.
- Position labels at eye level for easy scanning.
- Consider color-coding shelves (A=red, B=blue, etc.).
Handle exceptions efficiently
- Skip out-of-stock items and deal with them separately.
- Use partial picking for split shipments.
- Train staff on the partial picking workflow.
Workflow integration
- Filter by order tags to batch similar orders.
- Batch pick all orders for a specific carrier.
- Group orders by shipping priority or deadline.
Troubleshooting
“No started order found for slot”
- Ensure you’re scanning a valid slot barcode from the current batch.
- Check that the slot label matches your configured slot names.
- Verify the order hasn’t already been fulfilled.
“Batch is not fully picked”
- Some items still have quantity = 0.
- Either pick the remaining items or use “Force Complete” to finish anyway.
- Check the overview screen to see which items are missing.
“This batch is being picked by [User]”
- Batches are locked to the user who created them.
- Other users can view but not pick the batch.
- The original user must complete or delete the batch.
Concurrent modification errors
If multiple people try to modify the same batch simultaneously, you may see errors. The batch creator should be the only one actively picking.
Requirements
- Available on paid plans with the Batch Picking feature enabled.
- Requires storage locations to be configured for optimal routing.
- Requires a barcode scanner for efficient operation.
- Physical bins, totes, or shelf slots needed for order separation.